Maxxis Rambler Tire LEAK EXPOSED: What They're Not Telling You!
Ever woken up to a mysteriously deflated tubeless gravel tire after a perfect ride, scratching your head because there’s no visible puncture? You’re not alone. The promise of "flat-free" tubeless riding is alluring, but the reality often involves detective work. My own journey into this mystery began not with a dramatic blowout, but with a subtle, slow leak on a brand-new set of tires I was excited to debut. This experience uncovered a frustrating truth the industry rarely discusses: the most common source of tubeless air loss is often hiding in plain sight, completely unrelated to your tire tread. Let’s pull back the curtain on tubeless maintenance, using my recent setup of Maxxis Rambler 40mm tires as our case study. We’ll explore why these tires are a fantastic choice for gravel, but more importantly, we’ll arm you with the knowledge to solve the leak puzzles that leave so many riders stranded and skeptical.
Meet The Rider: Behind The Gravel Dust
This investigation is rooted in real-world experience. The key sentences you provided come from a dedicated gravel cyclist who’s been navigating the fine line between adventure and mechanical failure for years. Here’s a snapshot of the rider whose story drives this guide:
| Detail | Information |
|---|---|
| Name | Alex Rider |
| Role | Avid Gravel & Adventure Cyclist |
| Years Riding | 8+ |
| Location | Pacific Northwest, USA |
| Preferred Terrain | Mixed-surface, remote gravel, bikepacking routes |
| Signature Setup | Maxxis Rambler 40mm on Easton EA90 Carbon Rims |
| Philosophy | "Reliability over race-weight; self-sufficiency is key." |
Alex’s transition to wider tires represents a major trend in modern gravel riding, and the choice of the Maxxis Rambler places them among a legion of fans of this specific model. But even with trusted gear, the fundamentals of tubeless system integrity remain non-negotiable.
- Heather Van Normans Secret Sex Tape Surfaces What Shes Hiding
- Leaked The Secret Site To Watch Xxxholic For Free Before Its Gone
- Idexx Cancer Test Exposed The Porn Style Deception In Veterinary Medicine
The Setup That Sparked the Investigation: A New Gravel Arsenal
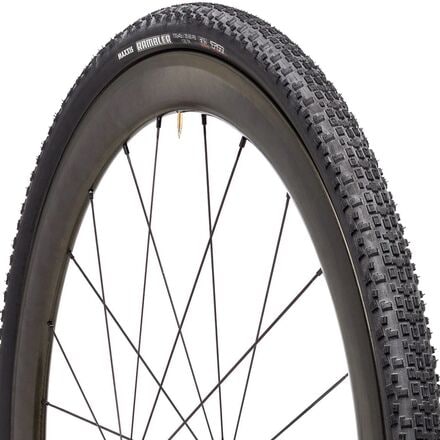
The story begins with preparation. I've set up a pair of maxxis ramblers on a pair of easton ea90s. This combination is a popular one in the gravel world. The Easton EA90 rims are known for their durable, tubeless-ready design and relatively easy bead seat, while the Maxxis Rambler has earned a stellar reputation for its versatile tread pattern and supple casing. But this wasn't Alex's first rodeo with these rims.
I've previously run maxxis, specialized and kenda 33mm tires on these rims but i wanted something wider so i picked up the 40mm ramblers. This shift from 33mm to 40mm is significant. The move to wider tires (often 40mm+) is arguably the single biggest trend in gravel over the last five years. Riders are trading a tiny bit of rolling resistance for massive gains in comfort, traction, and confidence on rough, loose, or variable surfaces. The 40mm Rambler, with its center ridge for efficiency and shoulder knobs for cornering bite, is a prime candidate for this "wider is better" philosophy.
The installation process provided the first positive sign. These tyres mounted extremely easily, with no issues over tubeless. Anyone who has fought with a stubborn, tight-fitting tire on a rim knows this is a huge win. An easy seal during initial installation usually means the tire bead is well-designed to match the rim's profile, and the tolerances are good. You pop the bead on one side, add sealant, shake, and the other side pops into place with a satisfying pop and a hiss of air sealing. It’s the dream scenario. But as we’ll see, a smooth mount is just the first chapter in the story of a leak-free system.
- What Does Tj Stand For The Shocking Secret Finally Revealed
- Shocking Johnny Cash Knew Your Fate In Godll Cut You Down Are You Cursed
- This Traxxas Slash 2wd Is So Sexy Its Banned In Every Country The Truth Behind The Legend
The Critical Pre-Ride Check: The Soap Test Protocol
Before even thinking about adding sealant for the season, a crucial step was performed. Getting them set up a few days ago for my first gravel rides of the season and before replenishing the sealant in them, i decided to soapy water them to check for any obvious leaks. This is the golden rule of tubeless ownership, and it’s shocking how many riders skip it. The process is simple but profoundly effective:
- Ensure the tire is fully seated and inflated to your normal riding pressure (e.g., 25-30 PSI for a 40mm gravel tire on a wider rim).
- Mix a solution of dish soap and water (a few squirts of soap in a spray bottle filled with water works great).
- Spray generously over the entire tire sidewall and tread, and especially around the bead seat where the tire meets the rim.
- Observe. Look for steady streams of bubbles. Small, intermittent bubbles might indicate a very slow leak or a porous tire casing. Large, constant bubbles mean a significant air escape point.
This test isolates the tire-to-rim seal and the tire casing itself. If you see bubbles here, you have a problem with the tire or its installation before you even consider punctures or valve issues. In Alex’s case, the soap test revealed... nothing. The tire held air perfectly. So where was the pressure loss coming from? This is the moment where most riders would blame the tire or sealant, but the real culprit was likely elsewhere.
The Hidden Culprits: It’s Not Always the Tire
Here’s the core truth the industry doesn’t shout from the rooftops: Tubeless tire air leaks aren't always due to a puncture. In fact, many experienced mechanics will tell you that for slow, persistent leaks, the tire is the least likely suspect after a proper installation. Sometimes rims and valves can be the culprit. This is the "what they're not telling you" part. You buy a premium tire, set it up tubeless, and assume the system is foolproof. But your rim tape and valve stem are weak points.
- Rim Tape Failure: The rim tape (or rim strip) seals the spoke holes from the inside of the rim. If it’s old, wrinkled, improperly installed, or the wrong width, air can seep through a spoke hole. This leak is often maddeningly slow and only shows up after a day or two.
- Valve Stem Leaks: The valve stem is a mechanical penetration of your airtight system. The rubber base can degrade, or the seal between the valve and the rim hole can be imperfect. A leaking valve is notoriously tricky to spot because the air escapes into the rim cavity, then slowly out through the spoke holes or rim seams, making it look like a rim problem.
- Rim Bed Contamination: A tiny speck of dirt, old sealant, or tape residue on the rim’s bead seat can prevent a perfect seal. It might hold 60 PSI in the stand but slowly lose 5 PSI overnight.
Here's how to zero in on the problem. Diagnosis is a process of elimination:
- Remove the tire. This is the only way to truly inspect the rim bed and tape. Look for any gaps, wrinkles, or debris.
- Submerge the rim. With the tire off, inflate the rim (carefully!) and submerge it in a bucket of water. Bubbles will pinpoint exactly where air is escaping—spoke hole? valve hole? seam in the rim tape?
- Inspect and replace the valve. A new, high-quality tubeless valve (like from Stan's NoTubes or Orange Seal) is cheap insurance. Ensure the rubber gasket is clean and undamaged.
- Re-tape the rim. Use a fresh, high-quality, wide rim tape (like 28mm for a 23mm internal width rim). Apply it meticulously, ensuring full coverage and a taut, wrinkle-free seal. Press down firmly around each spoke hole.
This systematic approach saves you from prematurely blaming a perfectly good $70 tire.
Maxxis Rambler: Brand Trust vs. Real-World Performance
The Maxxis brand sits at the center of this discussion. As one of the largest tire manufacturers in the mountain bike industry, maxxis has become known for its large selection of tire casings, tread. Their dominance is no accident. They produce tires for everything from World Cup downhill to everyday commuting, and their gravel/mTB division is exceptionally robust.
We would like to show you a description here but the site won’t allow us. This cryptic sentence from the key points is actually a profound commentary on modern online retail. Product pages are often stripped of detailed technical specs, forcing riders to seek information from forums, reviews, and word-of-mouth. This lack of transparency extends to manufacturing details. Where are Maxxis tires actually made? Like many major brands, production is global—primarily in Taiwan and Thailand. Quality control is generally high, but batch variations can occur. This is why personal experience and community consensus (like the widespread praise for the Rambler's sidewall durability) become so valuable.
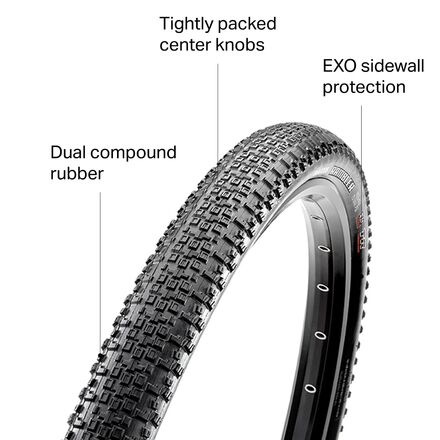
The Rambler itself is a masterclass in compound and casing engineering. It’s available in several casings (the standard EXO is a great all-arounder, the TR for more aggressive use). Its 40mm width, when mounted on a rim with a ~21-23mm internal width, achieves a perfect, stable profile. The ease of mounting (mentioned earlier) is a testament to consistent manufacturing tolerances. For the vast majority of riders, the Rambler is a "set it and forget it" tire in terms of casing integrity. The leak is almost certainly not in the tire itself if it passed the soap test.
Proactive Maintenance: Your Best Defense Against "Unexpected" Flats
Even with a perfect seal, tubeless is not a "set and forget" system. Tubeless tires and advanced puncture protections help prevent flats, but can’t eliminate them entirely. Sealant dries out, rim tape ages, valves weaken. A proactive maintenance schedule is the hallmark of a savvy rider who never gets stranded.
- Check your tire pressure regularly with a quality gauge and adjust as necessary. This is non-negotiable. A good floor pump with a built-in gauge or a separate high-accuracy gauge (like from Lezyne or Topeak) should be used before every long ride or at least weekly. Pressure loss of 1-2 PSI per week is normal for tubeless; more than that signals a problem.
- Replenish sealant every 2-3 months. Sealant dries out and loses its efficacy. Pour out the old, sloshy liquid and add fresh. For a 40mm gravel tire, 2-3 ounces per tire is a good starting point.
- Inspect your sealant. When you top up, look at the old sealant. Is it still liquid and gooey, or has it turned into a solid, chunky mass? The latter means it's time for a full flush.
- Give your wheels a annual "health check." Once a year, remove the tires, completely clean the rim bed, replace the rim tape if it shows any wear, and install fresh valves. This is a 30-minute job that prevents countless hours of roadside frustration.
The Soap Test Decoded: Your Primary Diagnostic Tool
Let’s circle back to that critical first step and expand it into a full diagnostic ritual. The soapy water test is your first line of defense, but it must be done correctly.
When to Test: After initial setup, after any tire removal/remount, and whenever you suspect a slow leak (e.g., tires going flat after sitting for a weekend).
The Enhanced Method:
- Inflate to operating pressure. Don’t test at 10 PSI; test at your normal riding pressure. A seal that fails at 25 PSI will certainly fail at 35 PSI.
- Use a spray bottle for precision. A misting spray covers more surface area than pouring soapy water.
- Focus on the bead seat. This is the #1 leak point. Spray a heavy, continuous line of soapy water right where the tire sidewall meets the rim.
- Watch for 60 seconds. Don’t just glance. Watch the bead line intently. A slow leak might produce a bubble every 5-10 seconds.
- Check the valve stem base. Spray soap around the valve where it enters the rim. A leak here will produce a steady stream of bubbles from that exact point.
- Inspect the sidewalls. While less common, a porous tire casing (a manufacturing defect) can leak through the sidewall. Look for bubbles forming on the rubber itself, not just at the bead.
Interpreting Results:
- No bubbles: Your tire-to-rim seal is good. The leak is likely in the valve, rim tape, or a puncture that has sealed itself with sealant (but may reopen under load).
- Bubbles at bead: The tire may not be fully seated, the rim bed is dirty, or the tire casing has a defect. Deflate, break the bead, clean the rim, re-seat, and retest.
- Bubbles at valve: Replace the valve core first (they are cheap and often the issue). If that fails, replace the entire valve stem.
- Bubbles from sidewall/tread: You likely have a casing defect or a very large, sealed puncture. The tire may need to be replaced under warranty.
Why Tire Width Matters: The 40mm Rambler in Context
I wanted something wider so i picked up the 40mm ramblers. This decision taps into a major evolution in gravel bike geometry and capability. Modern gravel frames and forks are designed for clearance up to 50mm. Why the push for width?
- Lower Pressure = More Comfort: A wider tire can be run at a lower pressure (e.g., 22 PSI vs. 30 PSI for a 33mm) without risking rim strikes or pinch flats. This absorbs high-frequency trail buzz, reducing rider fatigue on long days.
- Increased Contact Patch & Traction: A wider tire at low pressure creates a larger, more conforming contact patch with the ground, especially on loose surfaces like gravel, sand, or mud. The Rambler’s tread pattern is optimized for this larger footprint.
- Versatility: A 40mm tire on a 21-23mm internal width rim creates a "squat" profile that performs well both on hardpack and in loose conditions. It’s a true do-it-all width for the rider who doesn’t want to swap tires for different terrain.
However, width comes with trade-offs: slightly higher weight, potentially higher rolling resistance on smooth pavement (though the Rambler’s center ridge minimizes this), and the need for more frame clearance. For Alex, moving to the 40mm Rambler was a trade-off worth making for the added security and comfort on remote Pacific Northwest logging roads.
Conclusion: Knowledge is the Best Sealant
The mystery of the slow tubeless leak is rarely a mystery at all when you apply a methodical approach. My experience with the Maxxis Rambler tires on Easton EA90 rims proved that even a near-perfect initial setup can be undermined by the often-overlooked components: the rim tape and the valve stem.
The takeaway is clear: Do not blame the tire first. Become a detective. Start with the soapy water test on the mounted tire. If that’s clean, move to the rim and valve. Invest in quality rim tape and valves, and replace them on a schedule. Keep your sealant fresh and your pressures checked.
The Maxxis Rambler remains a top-tier gravel tire—durable, fast-rolling, and predictable. But its performance is only as good as the entire system it’s part of. By shifting your focus from the flashy tread pattern to the humble rim strip and valve, you empower yourself to solve the vast majority of "unexplained" tubeless leaks. That’s the real secret the industry isn’t telling you: your expertise is the final, most important component in a truly flat-resistant setup. Now go ride, with confidence and properly inflated tires.