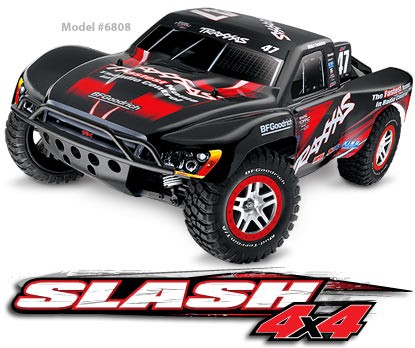
SHOCKING Traxxas Slash 4x4 4x4 Body Leak Exposes A Secret That Will BLOW Your Mind!
Have you ever felt the crushing disappointment of watching your prized Traxxas Slash 4x4 suffer a catastrophic body failure? That sickening crack, the sudden tear during a jump, or the slow, frustrating leak that turns your pristine shell into a waterlogged mess? It’s a rite of passage for RC enthusiasts, a moment that separates the casual hobbyist from the dedicated builder. But what if I told you this common problem isn’t just a flaw in the plastic—it’s a hidden opportunity? A secret gateway to not only solving the leak but completely transforming your rig’s durability, aesthetics, and performance? The solution lies not in a magic sealant, but in understanding the entire ecosystem of RC body upgrades. From body mods and accessories to beefy new tires, I walk you through each step of the upgrade process, revealing how a simple body swap can redefine your entire RC experience. Whether you're into RC bashing or scale realism, this changes everything.
The "Leak" That Started It All: Understanding RC Body Failure
Before we dive into solutions, we must diagnose the problem. The "leak" in our shocking headline isn't just about water; it’s a metaphor for lost potential. Polycarbonate bodies, like those from Traxxas, are engineered for a balance of light weight and impact resistance. However, they are not indestructible. Stress points around wheel wells, mounting posts, and the front/rear bumpers are prone to cracking under repeated high-impact bashing or during hard landings. A small crack becomes a large tear, and suddenly, mud, water, and debris infiltrate the cabin, adding weight, damaging electronics, and ruining the scale detail you love.
The core secret? The body is not just a cosmetic shell; it’s a performance component. Its shape affects aerodynamics (or lack thereof for bashers), weight distribution, and even how your tires interact with the surface. A leak is the first symptom of a body that’s either wrong for your driving style or has reached the end of its lifecycle. Fixing the leak with tape is a temporary band-aid. The real fix is a strategic upgrade.
- Urban Waxx Exposed The Leaked List Of Secret Nude Waxing Spots
- Exclusive You Wont Believe What This Traxxas Sand Car Can Do Leaked Footage Inside
- Viral Alert Xxl Mag Xxls Massive Leak What Theyre Hiding From You
The Foundation: Choosing the Right Body Shell for Your Slash 4x4
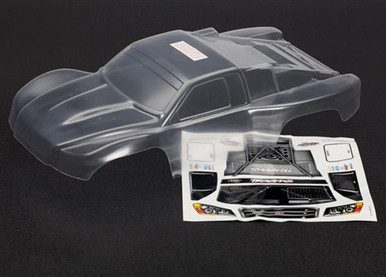
Traxxas offers a variety of different body shells with unique shapes and designs that can improve the overall performance of your Slash. This isn’t just marketing hype; it’s engineering. For example, a sleeker and more aerodynamic design (like the Traxxas ProGraphix body) can actually help a high-speed VXL model cut through the air with less drag, translating to a higher top speed and more efficient battery use. Conversely, a boxier, more scale-realistic body with integrated fenders might be perfect for a crawling or trail rig, offering better protection for the wheels and suspension from debris.
This is the Traxxas ProGraphix body. It represents the pinnacle of their pre-painted, detailed offerings. The detailed graphics are fully integrated into the polycarbonate, meaning they won’t peel or scratch off like decals. Slash 4x4 & Slash VXL from mild to wild, choose your own colors to personalize your body. You’re not limited to one look. This customization is key to building a rig that feels uniquely yours.
But what about aftermarket options? Summitlink custom body compatible for 1/10 scale RC car or truck (truck not included) (graffiti pink pig) ages 15 years and up. This sentence highlights a crucial point: compatibility and audience. The Summitlink body is a fantastic example of the thriving aftermarket. It’s designed to fit the Traxxas Slash 4x4 mounting points perfectly. The "graffiti pink pig" is a specific, bold aesthetic choice, appealing to hobbyists who want to stand out. The "ages 15 and up" note is a standard safety and complexity rating, reminding us that these models involve small parts and require a certain level of dexterity and understanding for proper assembly and modification.
- August Taylor Xnxx Leak The Viral Video Thats Too Hot To Handle
- Shocking Gay Pics From Xnxx Exposed Nude Photos You Cant Unsee
- Shocking Leak Nikki Sixxs Secret Quotes On Nude Encounters And Wild Sex Must Read
A Personal Journey: My Belated Slash 4x4 Ultimate Build Thread
Here I have a belated build thread about my Traxxas Slash 4x4 Ultimate, the latest one at the time before they had the clipless body. This personal anecdote is where theory meets practice. The "Ultimate" was Traxxas’s high-end, pre-assembled basher with all the aluminum goodies. My build thread documented the journey from stock to monster. The body was the first major change. I quickly learned that the stock body, while cool, was a weak point. After a particularly aggressive session that resulted in a massive crack across the hood, I knew I needed something tougher.
These tough polycarbonate bodies come in various colors and designs so you get to choose your own. I didn’t just want a replacement; I wanted an upgrade. I explored options from JConcepts, Parma, and ProLine. Each had its own strengths—some were pre-cut for specific accessories like light bars, others had more aggressive aerodynamic features. The choice became part of the fun. I ultimately went with a ProLine body for its thicker polycarbonate and aggressive stance, which complemented my new suspension and tire setup perfectly.
The Installation Secret: Making Your Body LAST
You’ve chosen the perfect shell. Now, the most critical step: installation. A poorly mounted body will fail, no matter how tough it is. This is where the "secret" of longevity is revealed. The standard Traxxas body posts are functional but can create stress risers. The goal is to secure the body without overtightening and creating new crack points.
Get gorilla tape and cover the inside of the body. This is a legendary hack in the RC community. Before you even think about mounting posts, cut small pieces of high-quality Gorilla Tape (or similar reinforced duct tape) and apply them to the inside of the body at all stress points: around the wheel wells, the mounting post holes, and along the front and rear edges. This tape acts as an internal reinforcement, distributing stress and preventing small cracks from propagating. It’s invisible from the outside and adds a phenomenal amount of durability. Will last longer for you is an understatement; this trick can double or triple the service life of a body.
Can do the Shoe Goo trick too, that is a bit more messy. Shoe Goo, a flexible, rubbery adhesive, is the alternative. You can apply a thin bead around the outside of the mounting post holes on the body before screwing it down. As you tighten the screw, the Shoe Goo is squeezed into a perfect gasket, creating a cushion and a waterproof seal. It’s excellent for sealing against leaks. However, it’s messy, can squeeze out and look ugly if over-applied, and makes future removal more difficult (you’ll need to cut it away). Gorilla tape inside is cleaner and more about structural integrity; Shoe Goo outside is more about sealing and vibration dampening. Many veterans use both: tape inside for strength, a tiny dab of Shoe Goo on the post for seal and cushion.
Step-by-Step: The Ultimate Body Mounting Process
- Test Fit: Place the body on the chassis. Mark all mounting post locations with a fine-tip marker.
- Reinforce: Apply small (1/2" x 1/2") squares of Gorilla Tape to the inside of the body at every marked spot and along high-stress edges.
- Drill (if necessary): Some aftermarket bodies require slightly larger holes for posts. If so, drill carefully with a small bit to avoid cracking.
- Seal (Optional): Apply a tiny pea-sized amount of Shoe Goo to the top of each chassis mounting post.
- Secure: Place the body on the chassis and start all screws by hand. Tighten in a star pattern (like lug nuts on a car) to evenly distribute pressure. Do NOT overtighten! The polycarbonate should be snug but not crushed. You should be able to flex the body slightly with finger pressure.
- Trim: Use a sharp hobby knife to carefully trim any excess plastic around the wheel wells or other areas for tire clearance. A perfect fit prevents rubbing, which is a major cause of body wear.
The Performance Connection: How Your Body Affects Your Drive
This is the part most rookies miss. Enhance both the aesthetics and performance—these are not mutually exclusive. The shape of your body directly influences how your Slash handles.
- Weight Distribution: A body with heavy pre-painted graphics or added scale accessories (like a roll cage, light bar, or spare tire) will raise the center of gravity. This can make the truck more prone to rolling. A lighter, minimalist body is better for high-speed racing.
- Aerodynamics (For Speed): A smooth, sloping nose and tapered rear (like on a ProGraphix or certain drag racing bodies) reduces air resistance. On a fast Slash VXL, this can mean a 5-10% increase in top speed and better battery efficiency.
- Protection (For Bashing): A body with extended, integrated fenders (common on monster truck and short course truck replicas) does a better job of deflecting mud, rocks, and grass away from the wheels and suspension components, keeping them cleaner and reducing wear.
- Tire Clearance: This is paramount. A body that rubs on the tires during full suspension articulation will quickly wear a hole in the sidewall. Always check for clearance with the tires turned fully in both directions and the suspension compressed.
With all that said, in reply to your question, the person that buys this 'kit' for $130 is probably the person that wants to have an option for... complete transformation. The "$130 kit" likely refers to a combo package: a high-end aftermarket body, a set of decals or vinyl wraps for further customization, and perhaps some mounting hardware. This person is not looking for a simple replacement. They are an enthusiast who understands that the body is the final, most visible layer of their vehicle’s personality and performance character. They want to tailor every aspect.
Beyond the Body: The Complete Upgrade Ecosystem
A new body is often the catalyst for a full build. From body mods and accessories to beefy new tires, the process is interconnected. Installing a new, wider body might necessitate wider wheels and tires to fill the fenders properly. That new tire combo changes the gearing and may require a different spur gear or pinion to maintain the same powerband. The new, heavier wheels and tires increase unsprung weight, which might make you want to upgrade to aluminum shock absorbers for better damping control.
Common Questions Answered:
- "Will a different body fit my chassis without modification?" Most 1/10 scale SC (Short Course) and MT (Monster Truck) bodies for the Slash will fit with minimal or no modification, as they share the same basic wheelbase and mounting point layout. Always check the manufacturer’s compatibility chart.
- "Is polycarbonate the only option?" For durable, flexible RC bodies, yes. Lexan is a brand name, but polycarbonate is the material. There are different grades and thicknesses. Thicker (e.g., 1.0mm vs. 0.8mm) is more durable but slightly heavier.
- "How do I paint a polycarbonate body?"Never use standard model paints. You must use paints specifically formulated for polycarbonate, like Tamiya PS or Testor’s Spray Lacquer for Plastics. Spray in light, even coats in a well-ventilated area. Always use a proper primer for plastics first for best adhesion.
The Final Secret: It’s About the Journey, Not Just the Destination
The "shocking secret" isn’t a single product or trick. It’s the realization that your RC vehicle is a modular platform. The body is your canvas and your first line of defense. By investing time in choosing the right shell, reinforcing it properly with tricks like internal Gorilla Tape, and understanding its performance implications, you do more than just fix a leak. You embark on a creative engineering project. You learn about materials science, aerodynamics, and mechanical design in a hands-on, exhilarating way.
That belated build thread I mentioned? It’s still going. The body has been replaced twice—once due to a spectacular crash on a jump that would have destroyed a lesser shell, and once because I simply wanted a new color scheme for a different track. Each time, the process of selecting, prepping, and installing the new body deepened my connection to the truck. It stopped being a "toy" and became my creation.
Conclusion: Build Your Legacy, One Body at a Time
So, the next time you see a hairline crack in your Slash’s body or feel a drip of water in the receiver box after a puddle, don’t just sigh and order an identical replacement. See it as an invitation. An invitation to explore the vibrant world of aftermarket bodies, to learn the sacred rituals of proper mounting with gorilla tape and Shoe Goo, and to consciously choose a shell that doesn’t just look good, but performs for your specific style of driving.
The "leak" exposed a fundamental truth: in the world of high-performance RC, every component matters. The body is your statement to the world and your first tool for tuning your machine’s character. Whether you’re a basher who needs a tank-like shell to survive the jumps, a scale enthusiast craving minute detail, or a speed demon hunting every last MPH, the perfect body is out there. Choose wisely, install it with care, and get ready for your Slash 4x4 to not only stop leaking but to blow your mind with what it can do. The secret was yours all along—it’s time to build.