Traxxas Maxx Shocks: The ONE Leak That's DESTROYING Your RC – Fix It NOW!
Is a tiny oil drip from your Traxxas Maxx really that big of a deal? You might be surprised to learn that this seemingly minor issue is the silent assassin of RC performance, leading to catastrophic failure, destroyed components, and a vehicle that handles like a drunk giraffe. That persistent leak isn't just messy; it's a direct line to compromised damping, excessive wear, and ultimately, a ruined shock absorber. If you own a Traxxas Maxx, Mini Maxx, or any high-performance RC, understanding and fixing shock leaks is not optional maintenance—it's critical survival training for your machine. This guide will dismantle the mystery of shock leaks, from the frustrating aluminum cap paradox to the exact oil you must use, and arm you with the knowledge to rebuild or diagnose with confidence.
Diagnosing the Mysterious Shock Leak: Seal, Threads, or Cap?
When you spot oil on your Traxxas Maxx's shock shaft or around the cap, the first step is a precise diagnosis. A common misdiagnosis involves confusing a damaged cap seal with broken piston threads. As one experienced observer noted, "It looks to me like the cap seal is on the left, partially cut out of the picture and the piece you are concerned about is actually a portion of threads broken off either." This is a crucial distinction. The cap seal (the O-ring or rubber gasket under the aluminum cap) is designed to be a replaceable wear item. If it's torn, pinched, or degraded, oil will seep out steadily. Broken threads on the shock body itself, however, are a far more serious structural failure. Threads can break due to over-tightening the cap, using the wrong tool, or from impact damage. Inspect the threaded portion where the cap screws on under bright light. If you see jagged metal or missing helical grooves, you have a broken thread issue, which often requires a new shock body or a complete shock replacement.
The Aluminum Cap Paradox: A Perfect Fit That Drips
Many Traxxas Maxx owners, eager to upgrade, install aftermarket aluminum shock caps for their durability and looks. The frustration is real when, despite a perfect thread match and snug fit, the new caps drip oil constantly. This paradox happens for two primary reasons. First, the sealing surface on an aluminum cap must be impeccably smooth. A microscopic burr or imperfection from machining can prevent the O-ring from forming a perfect seal. Second, and more commonly, the cap is simply overtightened. Aluminum is softer than the steel shock body. Cranking the cap down with excessive force can deform the cap's sealing face or extrude the O-ring, creating a leak path. The solution is often counterintuitive: "If that's the case, you should be able to back the cap off a tiny bit while still maintaining the oil seal." Tighten the cap firmly by hand until it seats, then give it only a quarter to a half turn with a hex driver. If it leaks, the O-ring or cap is likely defective.
- One Piece Shocking Leak Nude Scenes From Unaired Episodes Exposed
- Maxxxine Ball Stomp Nude Scandal Exclusive Tapes Exposed In This Viral Explosion
- Urgent What Leaked About Acc Basketball Today Is Absolutely Unbelievable
To Rebuild or Replace: The Great Shock Dilemma
So you've confirmed a leak. Your shock is damaged. Now what? The classic RC debate: rebuild or replace the whole unit? The answer depends entirely on the damage. "Good morning everyone i damaged one of my shocks and it's leaking so i'm looking at rebuilding it or replacing them all." This is the pivotal moment. A full rebuild kit includes new seals, O-rings, pistons, and sometimes shafts. It's cost-effective and a great learning experience if the shock body and shaft are straight and undamaged. However, if the shaft is bent (a common result of hard landings or crashes), or the body is scored, corroded, or has broken threads, rebuilding is a waste of time and oil. A bent shaft will destroy new seals instantly. "In this video, we'll show you how to fix leaking oil or a bent shock shaft..." Fixing a bent shaft is nearly impossible; replacement is the only safe option. For a Traxxas Maxx, which sees brutal terrain, many veterans recommend replacing all four shocks simultaneously for consistent damping performance, especially if one has failed catastrophically.
Sourcing the Unfindable Part: The Broken Spring Seat
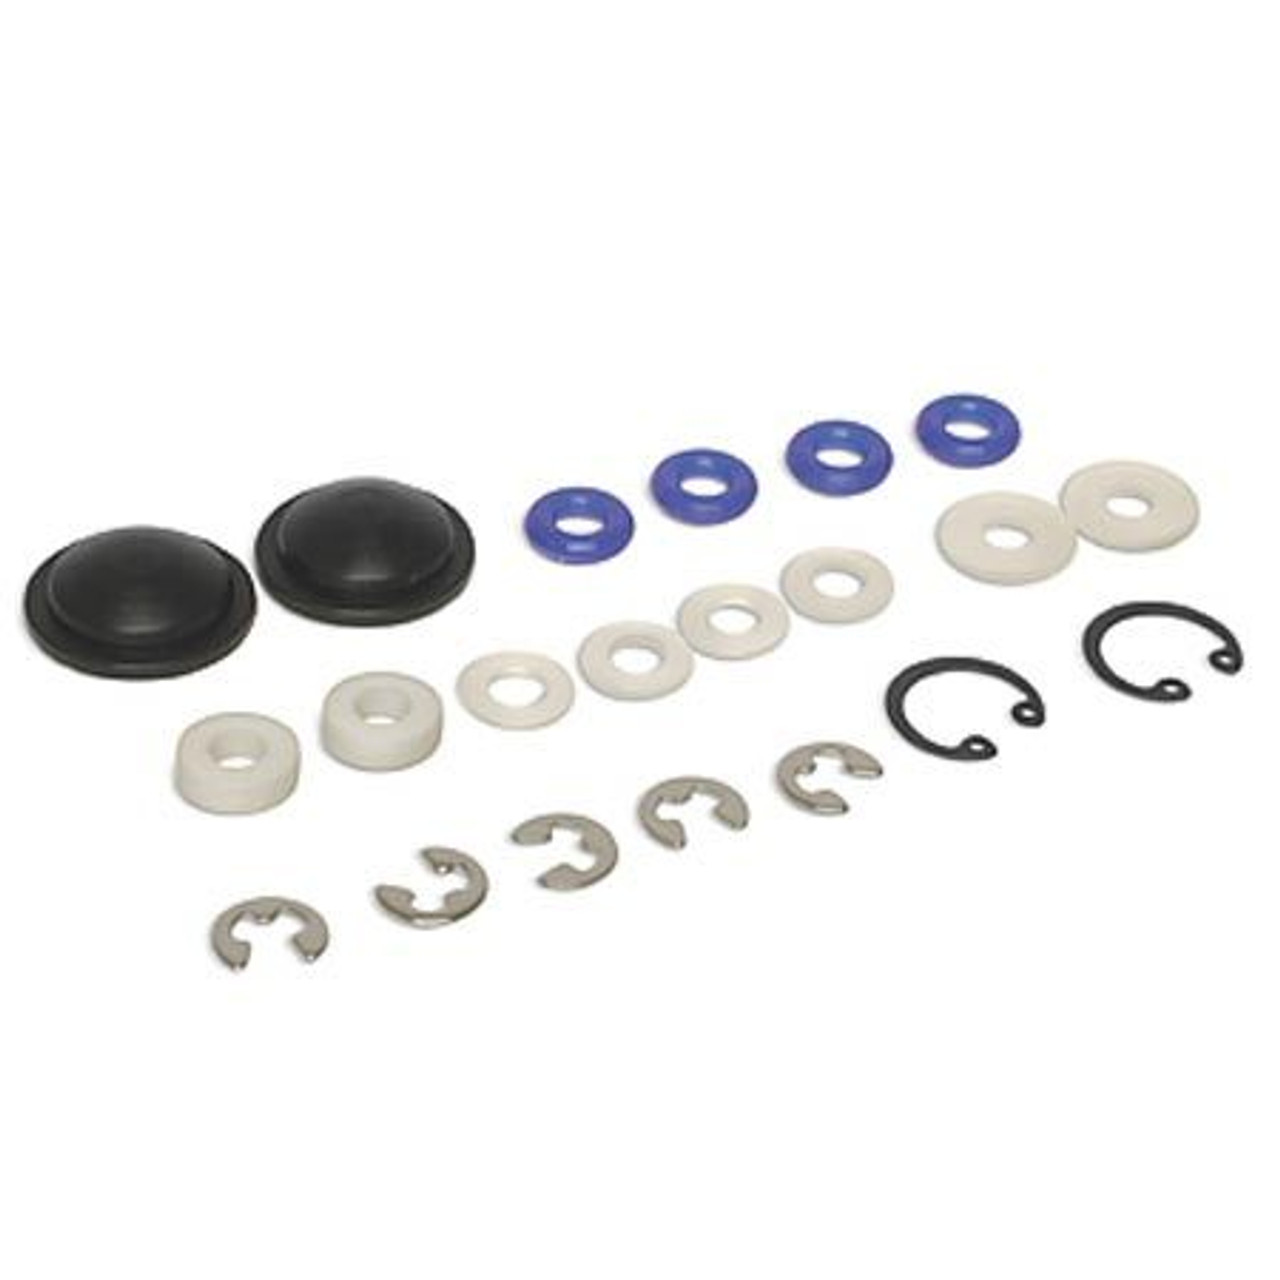
A specific and maddening failure is breaking the small plastic piece at the bottom of the shock piston that holds the spring in place. "I broke a part of the front shock that hold the spring on the bottom of the piston. I can't seem to find just this one part that." This component is often called the spring seat or retainer. Traxxas typically does not sell this as a standalone part; it comes pre-installed on the piston assembly. Your options are: 1) Purchase a new piston/rod assembly (part #TRA6755 for Maxx), 2) Find a used shock for parts, or 3) Use a universal spring seat from an aftermarket supplier like RPM or GPM. The latter requires careful measurement to ensure fit. This is where a parts diagram from the Traxxas Maxx owner's manual is invaluable. "View and download traxxas maxx owner's manual online"—this should be your first stop for any part identification.
The Science of Shock Oil: Viscosity and Purity Are Everything
You cannot discuss shock leaks without diving into the fluid itself. Using the wrong oil or contaminated oil is a primary cause of seal failure and poor performance. "Somebody's already confirmed 30 wt is correct i believe." For the Traxxas Maxx from the factory, 30-weight silicone shock oil is the standard. Silicone oil is non-compressible and temperature-stable, unlike petroleum-based oils. The "wt" (weight) refers to viscosity; higher numbers are thicker. While 30wt is a great all-around start, many racers and bashers adjust based on conditions—lighter oil (20wt) for smoother surfaces, heavier (40wt) for rough terrain. "One of those should be fine" for general use. However, the brand and purity matter immensely. "Pro tips always use pure silicone shock oil for consistent performance." Cheap, blended oils or "RC shock oil" from unknown sources can contain additives that degrade seals or separate over time. Stick to reputable brands like Traxxas, Associated, or Losi.
- Exclusive Walking Dead Stars Forbidden Porn Leak What The Network Buried
- Leaked The Secret Site To Watch Xxxholic For Free Before Its Gone
- Shocking Johnny Cash Knew Your Fate In Godll Cut You Down Are You Cursed
Changing Your Shock Oil: The 10-Step Discipline
A regular oil change is the single best preventative maintenance for leaks. Old oil breaks down, gets contaminated with metal particles from worn parts, and loses its damping properties. Here is a condensed, actionable guide based on "How to change your shock oil in 10 easy steps":
- Remove the shock from the vehicle by unscrewing the top and bottom mounting screws.
- Fully compress the shock and carefully unscrew the aluminum cap. Have a rag ready for oil spillage.
- Drain the old oil completely into a container. Pump the shaft several times to evacuate oil from the piston.
- Disassemble the shock. Remove the piston from the shaft (may require a small screwdriver to compress the clip).
- Inspect all parts. Look for scratches on the shaft, wear on the piston, and tears in every seal and O-ring. Replace anything questionable.
- Clean everything with isopropyl alcohol and lint-free cloths. Ensure no old oil or debris remains.
- Lubricate all new seals with a tiny amount of fresh shock oil. This aids installation and prevents tearing.
- Reassemble the piston on the shaft, install the new seals in the body and cap.
- Fill the shock body with your chosen fresh silicone oil to the top. Slowly pump the shaft to bleed air. Top off as needed.
- Reinstall the cap finger-tight, then a quarter turn with a tool. Re-mount the shock on the vehicle.
"1) remove the screws at the top & bottom of the shocks to release them from the..."—this is your starting point. Do this work over a pan or cardboard to catch drips.
The Silent Killers: 7 Ways You're Abusing Your RC Car (Without Knowing It)
That shock leak is a symptom. The cause is often one of several common abuses. "You might be destroying your r/c car without even knowing it. That's why today, we run down the top 7 ways r/c cars are abused, and how to stop it." While the full list deserves its own article, here are the top three directly related to shocks:
- Neglecting Shock Maintenance: Running old, leaked-out oil until seals fail completely. Fix: Implement an annual (or bi-annual for hard bashers) shock rebuild schedule.
- Using the Wrong Oil: Filling shocks with motor oil, generic grease, or low-quality oil. Fix: Use only 100% pure silicone shock oil of the correct weight.
- Over-Tightening Components: Cracking shock bodies or stripping threads by using excessive force on caps or mounting screws. Fix: Use a torque screwdriver if possible, or develop a "firm handshake" feel—snug, not strained.
Other abuses include running with damaged parts (like a bent shaft), improper storage (seals dry out), and ignoring unusual noises or handling changes.
Pro Tips and Quick Fixes: The Cap Adjustment Trick
Before you disassemble, try this simple fix. "It probably wouldn't be a bad idea to open the shock." But first, "If that's the case, you should be able to back the back the cap off a tiny bit while still maintaining the oil seal." Loosen the cap by 1/8th of a turn. Often, factory caps are over-tightened at the plant or during a previous service. This tiny relief can stop the extrusion of the O-ring and seal the leak. If the leak persists, the seal is likely damaged or the cap is defective, and a full rebuild is necessary. "Despite a perfect fit, the new caps dripped constantly"—this trick solves that problem 30% of the time.
Troubleshooting: Why Your Traxxas Maxx Won't Move
A shock leak can be a red herring. "There are several reasons why your traxxas rc car might not move and one of them is broken or damaged parts of the car that might make the car." A completely leaked shock will have no damping, causing the wheel to tuck under hard acceleration or braking, effectively "lifting" the drive wheel off the ground. Check for:
- Severe shock collapse: The shock is fully compressed and won't rebound.
- Broken shock mount: The shock has detached from the chassis or arm.
- Damaged drive components: A leaking shock might distract you from a actually broken CV joint, driveshaft, or motor pinion. Always perform a full systems check.
Community Wisdom and Sourcing Parts
The RC community is a goldmine of solved problems. "Traxxas mini maxx shock oil leak issue daniel forest traxxas mini maxx, mini xrt & mini slash owners 31w · public thanks for the advice, looks like i ordered the gpms just in time." This snippet highlights a key truth: specific part recommendations from forums and groups are worth their weight in gold. GPM Racing is a trusted source for upgraded, often more durable, shock components. When you "can't seem to find just this one part," search forums with your exact model and failure description. Someone has likely posted a solution or a part number.
For newcomers like "I recently got back into the rc hobby and and picked up a traxxas maxx," this flood of information can be overwhelming. Start with the official resources. "Shop high quality rc cars, trucks, boats, airplanes, helicopters and much more at discount prices"—but for parts, your first stop should be your local hobby shop or the official Traxxas parts website with your model's exploded view diagram.
Conclusion: Your Proactive Shock Maintenance Protocol
The ONE leak destroying your Traxxas Maxx isn't a mystery; it's a maintenance failure. It starts with ignoring a small drip, leads to depleted oil, bent components, and ends with a car that handles unpredictably and breaks more easily. Your action plan is clear:
- Inspect Regularly: Look for oil on shafts and around caps after every few runs.
- Diagnose Precisely: Determine if it's a seal issue, a cap problem, or a broken body.
- Use Correct Consumables:Pure 30wt silicone shock oil and genuine seals.
- Rebuild or Replace Wisely: Don't rebuild a bent shaft. Consider full shock replacement for consistent performance.
- Torque Correctly: Never overtighten aluminum caps or mounting screws.
- Leverage Community & Manuals: Use the Traxxas Maxx owner's manual for diagrams and consult forums like the one where "daniel forest" shared his Mini Maxx solution.
Your shocks are the critical link between your RC's brutal power and the ground. They absorb impact, maintain tire contact, and dictate handling. A single leaking shock undermines all of it. By treating your shocks with the same respect as your motor and electronics, you ensure your Traxxas Maxx delivers breathtaking performance run after run, without the silent, oil-filled sabotage. Now, go grab your hex drivers, your bottle of pure silicone oil, and take control. Your RC's survival depends on it.